Neighbours talking over the garden gate has long been a tradition. They share gardening tips, complain about the weather and pests yet are ever eager to discuss their gardens. That is what I had in mind when creating this blog. So stop by my garden gate to find out the latest happenings in my garden.
Happy Gardening!
Garden Gnome
"All my life through, the new sights of Nature made me rejoice like a child." ~ Madame Marie Curie"
The what I thought wild turkey has been hanging out a lot in my garden and two neighbouring yards. But he or she is not a wild turkey. According to my neighbour it is a guinea hen! I had to go online and google that one and sure enough it does look like the picture of a guniea hen. Well it sure looked like a turkey to me. At any rate this beneficial and congenial critter is welcomed in my garden. I do hope it patrols my garden during growing season! It should may for perfect natural insect control.
I'm assuming it is a male because of the brighter colours. The theory proposed by my neighbour is this is an escapee from a farmer over the next concession and somehow this bird makes its way back and forth. For whatever reason this bird just likes hanging out in my garden. So I've been thinking that it might be a bad idea to get a few of the guinea hens myself.
Garden Gnome
© 2006

Our new grandbaby made her debute Dec. 23, 2006 at 8:03 pm. She weighed in at 8 lb 6 oz and is absolutely the most perfect little sweetheart you have ever seen!
Garden Gnome
© 2006


Garden Gnome
© 2006

This doesn't look all that much like a poinsettia but it is a left over one from last year. It had special meaning so I decided to try saving it. I'm not sure if any red will appear this year but the plant is alive and thriving.
Once the holiday season was over, I removed the foil cover from the pot and gave the plant a good watering then kept it moist but not wet. After a couple of weeks it looked like it was dead so I cut it back to about 4 inches, watered well then left it alone. A week or so later there were signs of new growth. Once I opened the greenhouse, the poinsettia was transferred there in the hopes it would revive. Well it did and here it is a year later!
So don't throw out those poinsettias. Take a chance to try reviving them and you just might be rewarded with a lovely houseplant.
Garden Gnome
© 2006

This is the time of year for heading to the bush or Christmas tree farm to cut the Christmas tree. It takes a lot of time and effort to find just the perfect tree. We haul it home to decorate it yet only to have to discard it in a couple of weeks at best. Others head to their local nursery or temporary Christmas tree booth to get their trees only to suffer the same fate.
So what does this have to do with gardening? Consider this year instead of buying a tree that will ultimately be discarded or a best burned in the woodstove, of buying a potted tree. You can buy them in larger sizes or for smaller homes consider a Norfolk Pine. These trees will keep giving back for years to come not only for your landscaping but also for bird shelter and the environment. Simple care for indoors until spring then plant outdoors. There are a few tips I would like to share if you decide to go this method.
When choosing a potted evergreen, consider where you want to plant it later if you will be planting. I've already mentioned the Norfolk Pine for smaller spaces and this tree will grow happily in a pot indoors so you could use the tree for several holiday seasons. If planting outdoors later, make sure you consider how big an evergreen can get. Leave plenty of room for growth. Choose a spot where a larger evergreen will not shadow your vegetable or sun loving flower beds garden. Ideally choose a location where you wil benefit from house shading in the summer or wind break in the winter. Once you have picked out your living Christmas tree, try to bring it home on a relatively mild day and even then protect the branches from wind burn. Place the tree in a spot where heating vents will not be blowing on it. Lighting should be LED if at all possible not only for energy savings but to prevent any heat damage to the branches. Don't hang heavy decorations on tender branches as this may damage them. Other than that, decorate as normal. Keep watered and once the holiday season is over, remove lighting and decorations then treat as an indoor house plant until spring.
When planting, dig a hole twice the diameter of the tree a little deeper than the height of the pot. Place a bit of peat moss in the hole. Carefully remove the pot and lightly loosen the root ball. Place the root ball in the hole and cover with soil, mounding slightly above ground level. Water well. You may need to add stakes to keep the tree straight until established.
Now sit back and enjoy your new bit of landscaping while you decide where to plant next year's Christmas tree.
Happy Gardening
Garden Gnome
©2006

A small hobby greenhouse is an ideal way to extend the growing season as much as three weeks on each end. Winterizing a small hobby greenhouse for continued winter use can present a challenge in areas such as ours. Our average minimum winter temperature is -9ºC (15.8ºF) for January. At these temperatures I found it was not feasible to keep the greenhouse going year round even with the winterizing I did and a small electric heater.
One problem with hobby greenhouses is they are leaky. To partially solve this problem I used clean marine grade silicone to seal along all seams inside the greenhouse. This solution was pratical and cheap. It did improve both heat and moisture retention. This is important because once a hard frost threatens water hoses should be disconnected. Two warnings, do not put any plants in the greenhouse until the silicone is cured! The fumes will kill plants hence the second warning. Keep the door and vent open during application. A fan will help move the fumes out quicker.
The hobby greenhouses generally have one roof vent that is difficult to seal and since it may be needed for temperature contol during the day cannot be sealed shut for winter. The best solution to this is to use a piece of bubble wrap or quilted material attached with velcro. The worst air leak problem is the door. When I bought mine, the door was the sliding design. It is virutally impossible to get a tight seal. I see where they have now changed the design of the door so perhaps the new hinge style is a bit better.
 Heat Sinks
Every greenhouse needs one or more heat sinks. My greenhouse has 4" gravel base that absorbes sun then reflects it back into the greenhouse. In summer it acts in reverse when hosed down cooling the inside temperatures. However, for extending the growing season and winterizing, additional heat sinks are needed. One problem that will become immediately clear is in an 6' x 8' greenhouse there is not a lot of room for large barrel style heat sinks although I am still contemplating trying a smaller barrel.
For this project, I used recycled margarine tubs, plastic food pails, matte black spray paint and water. I got margarine tubs and food pails from two local restaurants that were happy to let me cart them away for free. The spray paint cost about $5 for store brand. I washed the containers then set in the sun to dry. Then I put them in the shade upside down on carboard and gave them two coats of spray paint. Once dried I moved the containers into the greenhouse, filled each with water leaving 1" headspace and snapped the lids on. The containers were distributed throughout the greenhouse to absorb the sun during the day.
I found these small heat sinks worked relatively well. They went through the first winter well and held up well during the following summer. The next winter, the paint started flaking off likely from age, expansion and contraction. I left them for this winter as I simply shut down the greenhouse. This spring I plan to clean them up and re-spray. The only thing I plan to differently is add an anti-freeze agent to the water.
 Bubble Wrap North Wall
The north wall was sealed with clear marine grade silicone then insulated using bubble wrap and clear draft sealing tape. I used regular packaging bubble wrap that comes in a roll and draft stop clear tape. Total cost for bubble wrap and tape was about $This insulation remains on that wall year round. It is going into it's third season and has held up very nicely. I've done nothing to it since installation.
Installing the bubble wrap wasn't really difficult just tedious at times. I wiped the trim down with rubbing alcohol and let that dry before installing the strips. Strips were installed horizontally. The trick I used was to use a small piece of tape to hold the strip in place then secure all around the strip. The lower section took two full width strips. The upper section took one full width strip and a triangle about 8" high. Each strip slightly overlapped the previous and the joint was sealed with draft tape. As the strips went up so to did the temperature and humidity level in the greenhouse.
 Inside View
After the installation was complete, the plants were loaded into the greenhouse. These were mainly plants I wanted to take clippings of along with seedlings I hoped to grow during the winter. This picture taken at night shows the amount of condensation than in itself provides low temperature protection. All in all I was pleased with the results of the bubble wrap but the true test was how it would last the winter and if it would allow me to keep the greenhouse open year round. As already mentioned the bubble wrap did not provide enough insulation to keep the greenhouse open year round but it has proved to be very effective, durable and low cost.
 Roll-up Door Insulation
I created a bubble wrap roll-up blind for the door. The sliding door is almost impossible to seal so this was the next best thing since I had left over bubble wrap. On cloudy days and at night, I simply unrolled the blind and secured with two rocks then shut the door and put a rock in front to hold the door tight.
The first year the door would actually fall off in high winds something that I couldn't have with plants in the greenhouse. I took to using a rock until my husband devised a modification to secure the door.
Other ways of effective insulation include styrofoam or straw bales around the base and putting a blanket on the roof at night. Once the snow falls, my husband certainly would not be too keen at the blanket idea. The straw bales make a surprising amount of mess on garden paths and since mine are gravelled that was a consideration. The biggest problem with straw is it provides rodents a place to nest for the winter. Then there is the availability issue. Securing the styrofoam is a problem but I'm sure one could be overcome if you are so inclined.
A word on heating: There are many ways to provide supplemental heating for your greenhouse. My philosophy is to always start with the easiest then move up to other methods if needed. I started with a 150 watt grow light. It threw off enough heat so even heavier frosts were well tolerated. A long burning pillar candle an be added if the light is not enough heat. Be sure the candle is in a tip proof container secured by wet sand. I do not recommend this method overnight! Here the next level that is easiest and cheaper than other methods is surprisingly a small electric heater. These work well but only to a point with the smaller greenhouses and if you are anything like me the idea of the electric meter spinning because of the greenhouse heating is not a comforting thought. Other heating sources recommended but not tried sterno (cost), campstyle catelytic heater (cost), woodstove (definitely not inside for a 6' x 8'), hot water heating powed by a woodstove (ok if you have a shed near the greenhouse that will house the woodstove) and natural gas (expense of running lines). So that's as far as I am on heating the greenhouse.
Happy Gardening,
Garden Gnome
There is not a lot to do in the garden right now so I thought I would make a few entries on environmental issues that should be of interest to home gardeners. It's easy to sit back in our nice cosy homes, flip on whatever lights we want and enjoy a few hours in front of the tube. If we are cold we can crank up the heat. If we are hungry we can open our huge for some of us well stocked from our garden, refrigerators or freezes or we can drive to the store. We live in a country of consumerism and the more the better. But all these activities have consequences that we sometimes don't think about.
The theory of global warming is an interesting but controversial one. I opened this topic for discussion on my Yahoo group as to how it relates to people like us who garden as well as large scale farm operations. There is no doubt we are experiencing climate change with warmer winters, longer growing seasons, hotter summers and more violent weather.
I read in our local paper where we have had a big El Nino this so the winter should be warmer with more rain and less snow but more fog days. Now some will be happy with this news since it will mean less snow removal. In our area that will save municipalities a lot of money! Others like the local farmers won't be too happy with rain instead of snow. For home gardeners, it may mean drier soil conditions in the spring. A warmer spring or worse like this past lack of spring cold weather crops like peas and lettuces fail. A milder winter will also mean lower heating costs that should please anyone who pays for heating as well as environmentalists. On the flip side our natural gas provider will see reduced revenues for the second year in a row. They annouced a few months back of a rate reduction because of the warm winter last year. But some scientists and environmentalists are blaming these climate changes on global warming.
I'm not that old but can see myself where the weather is very much different than when I was a child. Then boots and warm winter gear were a must daily during the winter months. Now people are out and about in the winter with light fleese jackets and running shoes. Last winter I wore my boots twice so at that rate they are going to last a very long time! Many enviromentalists are pointing to our changing and volitile weather patterns as an indication of global warming. There is no doubt we are experiencing climate changes but some are saying that global warming is a myth so there are two sides to the issue. Yesterday I listened to a segment by author and columnist George Monbiot who is warning about global warming. He has a blog, http://www.monbiot.com , that is a wealth of information on the subject as well as other things that we as gardeners should be concerned with like genetically modified seeds. Now the warnings about global warming have been coming for a long time. In 1984 Al Gore was elected to the Senate in the US. He wrote the book Earth in the Balance and continues to warn of global warming and saving the environment. In 1989 The Canadian Green Consumer Guide warned of global warming under the subject of greenhouse effect. Since then many environmentalists have issued the same warning. Is this a warning we should head?
The theory is global warming or an increase in the average global surface air temperature has been increasing because of the greenhouse effect. The premise is that greenhouse gases like carbon dioxide act like a blanket around the planet holding in solar radiation that normally would be reflected into space. Carbon dioxide is the most important of the greenhouse gases because we produce a lot of it through the burning of fossil fuels. The Kyoto Accord is an international treaty where countries agree to reduce their greenhouse gas emissions if their neighbouring countries agree to do likewise. The Kyoto Protocol came into force seven years after the Accord and provides the framework for countries to reduce carbon dioxide and five other greenhouse gases within certain periods of time. As good as this sounds, there has been opposition to Kyoto. In Canada the opposition came from Ralph Klein, premier of Alberta. Despite the good intentions of Kyoto it is a political solution not a scientific one.
As a scientist I tend to look at things in an analytical and scientific manner so the first rule in science is a theory is not an unsubstantiated guess. It has been tested scientifically by scientific method. Scientific method is observe and develop a testable hypothesis. In this case the observation is we are experiencing warmer climate conditions globally. The hypotheis is increased levels of carbon dioxide and other greenhouse gases are responsible for global warming. Next comes the prediction which would be as these gases increase so to with the atmospheric global temperature. The next stage is testing. Are we seeing what we predicted? If so retest several times. If retesting gives the same results accept the hypothesis and it becomes theory, if not reject the hypothesis and modify the hypothesis. So what happens when the levels of carbon dioxide decrease? The second hypothesis in the global warming issue is a decreasing carbon dioxide and greenhouse gases will stop global warming. The prediction is a decrease in carbon dioxide and greenhouse gases will cause a decrease in the atmospheric global temperature. The next step is testing and observing whether the prediction is confirmed. Is that what scientists are observing?
Garden Gnome

Wild Turkey
Many of the area farmers are taking advantage of the recent dry weather to harvest their fields. When the field behind us is harvested we never know what interesting critters will appear. I was out checking the greenhouse and garden beds last week to see what final winerizing was needed when I caught sight of a wild turkey in the field. After getting my husband to see the bird, I snapped several pictures of this wild tukey hen. She seem rather comfortable with our presence even getting a little closer to us while feeding.
The wild turkey is the largest game bird in North America. They were almost wiped out in Canada but have now increased in numbers due to strict hunting laws and reintroduction in some areas. The wild turkey population in Ontario is estimated to be about 30,000. Predators include fox, bobcats, great horned owls, raccoons, opossums, black snakes, skunks, crows, red squirrels, coyotes and fishers but some are only predators at certains stages of the wild turkey's life cycle. Fox are predators of the wild turkey at all stages of its life.
Happy Gardening
Garden Gnome

'Every one of us can do something to protect and care for our planet. We should live in such a way that makes a future possible.'
- Thich Nhat Hanh
Everything we do in life leaves some type of an impact on Mother Earth. As gardeners we are likely more aware of environmental issues than others. Still it saddens me when I hear some gardeners wanting the latest and quickest kill quick fix for even the simplest problem. The new buzz word is organic and many gardeners boast they are growing organically yet will resort to inorganic and toxic measures to solve a problem that could easily be solved in a more environmentally friendly way. The question then becomes, do you walk your talk?
We live on the water and as such are privy to wonderful and sometimes not so wonderful sights but for the most part the water provides eye candy uncomparable to anything else. The diversity in wildlife is truly amazing! However, there is an ugly side to living on the water and that is watching others dump just about anything into it. When I first saw sign of dumping, I was upset then angry but because neirth of those emotions get results, I decided to become proactive and do something about the problem. I chose to lead by example and one-on-one education. For the past few years, every time I saw someone dumping, I would stop and chat with them letting them know that we all have a vested interest in the water and what they were doing was harming it. It's funny as many I have spoke to did not even consider their actions were harmful! The end result has been a lot less dumping and word has spred so sometimes one person can make a difference.
Back to walking the talk. Everything we do in life has an effect! I am amongst other things an environmentalist but not professionally. That means that yes I do garden as organically as possible. The strongest chemical you will ever find in my garden is dish soap and even that is used sparingly. This mindset does not stop with the garden. I prefer to use baking soda and vinegar for most cleaning chores in the house. The strongest chemical used indoors for cleaning is Simple Green which is a concentrated non-toxic, non-mutagenic and non-carcinogenic cleaner that can be made in different strengths. I use re-usable spray bottles for the solution so they stay out of the landfill.
I could go on about all the things I do to leave the least impact on Mother Earth, from being energy conscious to home preserving to gardening organically and everything in between. This entry is simply one to get you thinking. Today, could you walk or bike instead of using the car. If you have to use the car, could you combine several errants in the one trip? Could you send an email instead of using paper? Could you eliminate just one toxic cleaner and substitute it for a non-toxic cleaner? What about that jar you were going to toss, could it be recycled or re-used? Does that item you wanted to buy really need all that packaging? Could you convert one person?
One voice does make a difference!
Happy Gardening
Garden Gnome


Today's the day
ghosts and goblins come out to play.

The leaves have been turning colour for awhile now. Many are on the ground and some trees are almost bare providing the incentive for leaf blowing and raking. Now that the leaves are accumulating it is time to consider composting. Leaves can provide wonderful organic matter for your soil. The first step is to gather the leaves.
While raking is the easiest and quietest method for gather leaves, it can be time consuming for larger yards. A leaf blower makes quick work of turning your leaves into piles. We use a leaf blower then chop each bag using the vacuum setting on the leaf blower. If you don't have a leaf blower spread the piles a little then run over them with your lawn mower to chop the leaves. The chopped leaves can then dumped into clear plastic bags or used as mulch on your garden beds. This is the point where many stop the process and simply put the leaves to the road for collection. Most communities here will pick up yard waste, compost it then sell the compost.
I like to compost leaves as well by adding a layer of chopped leaves to my compost bin. Leaves provide carbon for the compost. That still leaves me with a lot of leaves to compost so last year I tried my neighbour's method. He does not chop the leaves but gathers them in the plastic yard waste bags and sets them aside until spring. Then he dumps a bag or two onto his garden and rototillers to mix. I don't use a rototiller on my raised beds but I did work some of decomposed leaves into the soil. If you use this method, be warned the leaves do smell but that could be because mine had not been in the bags as long as his. Once worked into the soil the smell dissipated quickly , the leaves will continue decomposing. I'll use his method again this year except use chopped leaves along with mulching and composting in the bin.
Happy Gardening
Garden Gnome
One of the easiest ways to camoflage an unsightly feature or provide friendly privacy is to grow flowering vines. I think flowering vines are the most versatile for these types of applications but by all means can be grown just for their beauty.
 Clematis
While I have other flowering vines both annual and perennials, I have to admit to liking clematis. They put on a showy display. I have two clematis plants, one still has the original label then there is this one that we moved from our former house to this house. Unfortunately I do not have the original label and that was well before I discovered the benefits to a garden journal so I do not have the variety. It is a gorgeous flower!
Another perennial flowering vines in our zone that I like is trumpet vine. This hardy vine does well but takes a long time to flower. I planted one three years ago and it still hasn't flowered even though the foliage looks nice and healthy. I specifically wanted this flowering vine to attract hummingbirds. Hopefully it will flower for me next year.
Happy Gardening
Garden Gnome
Trees and Clouds
We had our first snow flurries on October 12. At times the flurries were thick enough to cause whiteout conditions. In between the flurries, I shot this video clip of one of the trees near the vegetable garden. There were a few snow flakes but I don't think they showed well in the video clip.
Video details: 21 seconds, taken by author October 12, 2006 using Cannon OPowershot A540
Today's sky is a mottled bluish grey with whispy white clouds surrounded with menacing, fast moving darker grey storm clouds. Grey, overcast skies with darker grey clouds will be the norm here from now to the end of November. I hooked up the light in the greenhouse to compensate for this. Occasionally the sun will break through now but only for brief periods of time. The greatest chance of this happening is during Indian Summer. The days are getting gradually shorter and shorter. Snow flurries, chilling winds and fog become more common. The leaves have started turning vibrant shades of reds, yellows and orange providing stiking contrast against the grey. They take on jewelled tones when the sun touches their leaves. Soon it will be time to do the final outside chores and shut down the greenhouse.
Happy Gardening
Garden Gnome
Gardens need sunflowers not only for the simple beauty but for attracting beneficial pollinators. Both of these photos were taken last year. Since this year's growing season has closed I thought I would start sharing older photos.
 Sunflower
I feed the birds and some of the mixture contains sunflower seeds. This is just regular, run of the mill sunflower seed or black oil sunflower seed. Each year I get volunteer sunflowers growing in the gardens and whenever possible, I leave them be. This volunteer sunflower is just a regular one. The black oil sunflowers are much smaller. The head will droop as the seeds mature. Despite the drooping head, birds will have the seeds picked clean in no time.
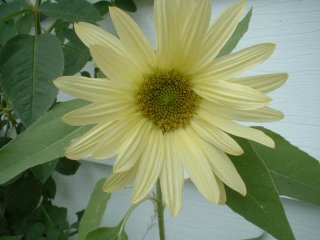 Jade Sunflower
The Jade Sunflower was planted from seeds bought online. The petals are a pale green hence its name. This sunflower got a lot of comments because it was so different. I kept some of the seeds before the birds got them with the intentions of planting in the 2006 season but never got around to it. I'll plant them in the spring of 2007.
Which ever way you look at it, sunflowers should be part of any garden :)
Happy Gardening
Garden Gnome
With fall's official arrival there is no doubting the inevitable. Yesterday, one of my neighbours picked off all the green tomatoes and pulled her vines. I'll leave mine a while longer. The average day of first frost here is October 9 While it has been cool enough to have the funace on, today is sunny and bright.
I did a clean pick this morning yielding a stuffed basket of tomatoes, cucumbers and beans. The zucchini have a couple of small fruit but will be a day or two before being ready for picking. The vines are not looking as nice as before. I pulled a few of the spent tomato vines but won't start a lot of the winterizing until next week. By then much of the heavy canning and freezing should be finished.
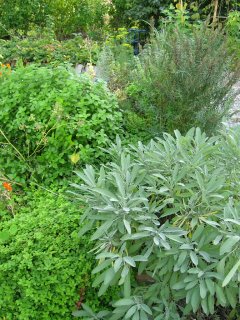 Herb Bed
A few new perennials were added to the herb bed this year. The bed is 40 square feet planted in the square foot gardening method along with companion planting. With the exception exception of lemon balm, the main herb garden has no other mints. The lemon balm may be moved to another location as it just is not behaving itself!
The herbs are tolerating the cooler weather nicely. There is little to do to prepare this bed for the winter other than pulling the stray lemon balm plants. Most of the herbs are perennials but I'll harvest whatever I can from the annuals. I prefer to freeze herbs for a better flavour but will likely end up drying some as well.
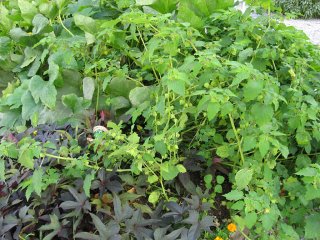 Ground Cherries
Ground cherries are a new crop for me this year. I'm not sure what I'm going to do with them yet other than hopefully get enough to make a pie. This is an interesting plant that at first appeared not to like our zone. The past few weeks, the ground cherries have been producing well and the vines look nice and healthy. Growing in the same bed is a sweet potato vine grown for looks along with marigolds. This is one of the newest beds so I'm pleased with the results.
Happy Gardening
Garden Gnome
We have a nice little tree on the waterfront. Then I noticed shelf fungus so of course was very interested. Shelf fungus is of the class Basidiomycetes. I haven't indentified the fungus but suffice to say the tree is still living so either this is a symbiotic fungus or parasitic.
 Fungus
The shelf fungus is rather impressive. Once identified, I will know whether it is edible or not. For the time being we are keeping an eye on the tree to see how it reacts. We have thought of removing the fungsu but so far there are no apparent ill effects in the tree. The tree itself looks nice and healthy which leads me to think this fungus might be a symbiotic one! So it might be best left alone.
 Fungus from the Top
The fungus has a dark centre from whence it is growing. The rest is rather bland looking. The underside where the spores are is fine pored with no visible spores.
I'll keep an eye and document this fungus. There is less to do in the garden as the weather cools but since we had to put the heat on today that will soon change. Once the first frost threatens, less than a month now, I will be busy picking whatever green tomatoes I can. The beans are pretty much finished. We've decided that because of blight problems this year all foliage will be burned not composted. Then the work of preparing the beds for winter will begin.
Happy Gardening
Garden Gnome
My husband takes no real interst in gardening but he does help out in the garden. Now about this time of year he starts camping out in the garden waiting very patiently along with the toaster and loaf of bread. I tried to tell him he could pull a few weeds while he's out there but no he is after one thing and one thing only, a beefsteak tomato!
 Beefmaster
The past couple of years have not been the best for beefsteak tomatoes. This year I planted Beefmaster and am being rewarded with nice sized beefsteaks. They are averaging just under a pound in weight. The plants are yielding one to two daily of the same size so I will definitely be saving seeds. This cultivar is a good producer that has done nicely in our zone, Zone 6A.
I try to grow as organic as possible so the tomatoes are not always perfect. The Beefmaster has a bit of splitting at the crown but that may be due to the amount of rain we've had. Late blight hit bed #1 and spread despite the measures I took of removing the affected foliage and burning it. All foliage from this bed will be removed and burned once the tomatoes have finished producing. Late blight has hit bed #6 but to a much lesser degree. Tomatoes coming from that bed are still copious. This is the bed where the Beefmasters are.
My neighbour asked me what the huge tomatoes were as he had never seen them that size. It's funny around here in the land of tomato growers that folk don't know much else besides hot house tomatoes and field tomatoes. Most can identify slicing tomatoes and romas but that is about it. When I talk of beefsteak or yellow tomatoes people just look confused. The reason people don't know about these tomatoes is they are not available in the grocery stores so unless they garden they have never been introduced to these wonderful cultivars. People, there are so many wonder varieties of tomatoes out there and so little time to taste test them all! I can recall when my family first tried yellow tomatoes years ago. My husband wrinkled up his nose and said eww before even tasting it. The kids were more adventurous. Now they are a family favourite and I grow some type of yellow cultivar each year. Last year I grew Mellow Yellows without a problem. They were good producers with no problems. This year I grew Lemon Boys and that is where the late blight started.
Happy Gardening
Garden Gnome
Tomatoes are big business in our area and are now being harvested daily upto a frost. I thought this would be a rather interesting entry for those who have never seen tomato harvesting on a large scale. The following pictures are from a relative's farm. The pictures were taken on Saturday. It was a cool, damp, on and off rainy day but the harvesting continued.
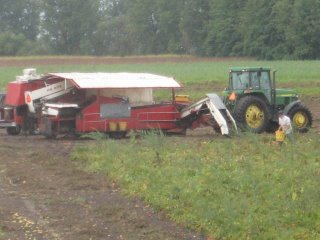 Tomato Harvester
Although some tomatoes are still hand picked on many farms, the vast majority are harvested using a harvester. A large tractor, in this case a John Deer (a blatant plug for certain family members), pulls the harvester behind it. Here it is either red (International Harvester) or green (John Deer) for tractors and believe me there are some strong preferances. The harvester stradles the tomato row then is pulled along the row. At the same time a tomato wagon is pulled alongside the harvester. Inside the harvester six to eight workers will quickly sort the tomatoes removing any clumps of dirt or green tomatoes as the tomatoes move along a conveyor belt to be deposited into the tomato wagon. Believe it or not in an area where jobs are scarce, migrant workers form the good portion of the agricultural workforce here. Farm children learn early how to help on the farms and everyone in the family lends a hand when it comes to harvesting. Unfortunately many living in surrounding towns do not want to work on the farms even if they are unemployed.
There is a hamper shown in the picture as well. This is the hamper size I process about ten of each year. I do stand corrected as I thought each hamper was almost a bushel. However a family member corrected me when we were figuring out how many cans of tomatoes would be in one wagon load. A hamper is 5/8 of a bushel and holds 30 lbs of tomatoes. One hamper will yield approximately fourteen quarts of whole tomatoes.
 Row of Tomatoes
Rows and rows of tomatoes are a wonderful sight! Our relative has several hundred acres some planted with tomatoes. The acreage is divided amongst several farms so there is a lot of travel time involved in harvesting. The tomatoes are sprayed with ethylene before harvesting so they ripen all at the same time.
A tomato field does not necessarily have the smell of fresh tomatoes! It is a mix fresh tomatoes, rotting tomatoes, mud and any other "country" that tend to waft by including the smells of machinery and vehicles. There are other smells as well especially when the sun is shining in full force!
When you first get to the field at the crack of dawn, there is a pleasant quietness but then people start arriving, trucks are started up along with the machinery and the busy chattering of the day starting. Harvesting is not quiet either especially on the harvestor. Other sounds fill the air. Inside the tractor the CB radio is on to keep things in sync. Quite often there is shouting along with arm waving. And so it goes through the day into the last minutes of light for the day.
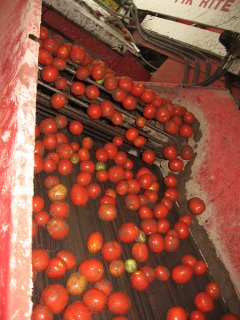 Tomatoes on Conveyor
Tomatoes move into the harvester then onto a conveyor belt that deposits them into the tomato wago. Tomato wagons are a very common sight this time of year. As the tomatoes move along the conveyor they are quickly and I mean quickly sorted as already mentioned. I think the worst part of harvesting is riding on the harvester because I have motion sickeness. The last time I rode on one was back just after we got married. Funds were tight and I was determined to help out. What makes the experience worse is the harvester itself is moving and the conveyor belt is moving so you get a double whammy! For those who can tolerate the harvester it is a relatively easy job as farm jobs go. The harvester is covered to provide shade for the workers something that is much appreciated in the hot or rainy weather. Right now we are having cold, damp weather so rubber gloves are almost a must as the moving air will make your hands feel like they are freezing. Even the tomatoes in my garden have been very cold to the touch when picking the last few days and the weather has made no attempt to warm up.
 Loading into Wagon
The tomatoes are loaded into the tomato wagon by the conveyor belt. The wagons are huge! They are also leaky and smelly. If I'm not mistaken each wagon holds 40 tonnes of tomatoes. The tomatoes are never nice and clean like those in a home garden. If it has rained recently or is raining when harvesting the tomatoes will be muddy. Watching the tomatoes being loading is rather interesting. Each wagon is loaded so it is higher in the middle then lower in the sides forming a hill of tomatoes at the top of the wagon. As a result of this practice it is also common to see tomatoes along the sides of the road en route to where the tomatoes are taken.
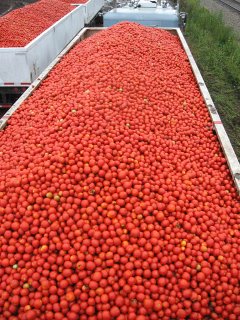 Wagon Load
The full tomato wagons are then lined up waiting to be hooked to another wagon, a tractor or a semi-truck for their final destination. The picture shows how the wagons are loaded then lined up for transportation. There is little space between the wagons. It is quite common to have several of these tomato wagons lined up waiting for transport. There are two processing plants within an 80 km distance of many of the tomato growers here. Mode of transporting the tomatoes will depend on where the farm is located in relation to the processing plant. Those with a shorter distance to travel will use tractors while those further from the plants will use semis.
 Tomato Trains
The wagons are often trained together to lessen the amount of trips needed so are a fairly common sight here. For those not in rural areas, tractors move slow so caution must always be used on the rural roads during harvest season. The semi-trucks are able to transport at a higher speed but care is still needed when driving.
My husband helps occasionally by driving a few loads to the plants when needed. This is rather difficult as my husband works all day but helping family is important so we do what we can. I like to ride with him. The plants are very interesting places to see. It is usually at night when we arrive and sometimes it takes awhile to unload. Each semi-truck lines-up behind the last waiting for their turn to be weighed. The tomatoes are then sampled for grading and the wagon is unloaded. The driver gets the weigh slip which includes the grading that determines the price the farmer will get for the tomatoes.
Now for me, it is more of a photo shoot opportunity. I love riding along especially on a night run. It is a chance for me to get some really nice pictures of things a lot of folk never get the opportunity to see and it is another chance to bond with my husband. It is also a learning opportunity. Many folk have little knowledge of where the food they eat comes from. More importantly it is sensory overload as I watch the bussel of plant workers, smell the most amazing smell of tomatoes cooking sometimes mingled with other smells, and hear an constant multitude of sounds.
 T900
T900
The tomatoes harvested from this field were a plum tomato hybrid T900. The flesh is thick and meaty with very little seed. The flavour is deep with an nice aromatic smell. The destination for these tomatoes will be most of the tomato products sold in the stores such as ketchup, soups, paste, whole and stewed, and just about every tomato product sold. I'll be using these to make a few sauces, ketchup, salsas, soup and paste.
I hope this entry provides a little more insight as to tomato farming.
Happy Gardening
Garden Gnome
Sunflowers are so bright and cheery that every garden needs at least one. They attract beneficial pollinators and seed eating birds. The problem I've had is getting them to grow to any size but this year I got a surprise. I've tried planting potted sunflowers but they have always failed so I've come to the conclusion that sunflowers do not transplant well. Over the winter I had birdfeeders out with black oil sunflower seeds. This year we have a lot of volunteer black oil sunflowers along with two volunteer huge sunflowers. Next year I'm going to plant sunflowers directly in the ground.
 Lady Beetle on Sunflower
When I go to the garden it is always with camera in hand. The sunflower was magnificant with a seed head alone spanning almost 8 inches in diameter. The bright yellow petals had a depth to them that just attacted the eye. This unidentified lady beetle provided a wonderful contrast against immature sunflower seeds. I think the lady beetle may be a C-7 but I'm not sure. At any rate it did not appear to be doing any damage so it is more than likely a beneficial beetle.
Happy Gardening
Garden Gnome
I've been very busy in the kitchen so if you want to check out some of my projects, check my cooking blog, http://momskitchencooking.blogspot.com. I thought I should give some type of a garden update though.
Today it is unseasonably cool so I might plant some lettuce later. The tomatoes are fairing despite battling late blight. The one bed is doing a lot better than the other. However, and I'm pretty sure it is that ornary teenage rabbit, has decided to take up residence in bed # 6 that is home to Heinz, beefmaster, romas and ancho peppers. It wouldn't be so bad except for having to pick the rest of the garden wearing my morning coffe! While my husband thinks this is rather So last night I sprinkled a copious amount of cayenne pepper throughout that bed. The zucchini continue to flourish after their bout with squash bore. They have taken over all the pathways, the garden, the house and are now talking about annexing neighbouring properties. The Kentucky Wonders are still producing and the Romanos have just started.
Happy Gardening
Garden Gnome
Shortly after moving in here we noticed a strange looking lily. There were no leaves at all! The flower itself was a pretty pale pink so we just left them to see what would happen. One day our neighbour remarked that my "naked ladies" were looking nice pointing at the strange lily. So I did a web search to find out more about this lily.
 Amaryllis belladonna
I thought my neighbour was joking about the name of this plant. The blooms were so pretty yet there were no leaves. I thought that was very odd. However, he wasn't joking about the common name for this plant. The scientific name for the Naked Lady or Belladonna Lily is Amaryllis belladonna. Of interest Amaryllis is a monotypic genus containing only the species Belladonna Lily (source: Wikipedia, http://en.wikipedia.org/wiki/Amaryllis) Naked Lady is a bulbous plant but is not a true lily despite the common names. I've heard them referred to as Jump-up Lilies and Magic Lilies. They like full sun but mine are in partial sun and do fine. They reach a height of two to three feet.
The Naked Lady has one of the most interesting growth cycles! The bulb produces bold, strap-like deep green leaves in the fall after blooming. The leaves die back by late spring and the bulb is then dormant until about mid-August in our Zone 6A. Suddenly almost overnight the stem will appear. The trumpet shaped, fragrant pale pink flowers are on a single stem with no leaves hence one of their common names. They will continue blooming through much of September.
It is a good idea to mark the location of Naked Ladies as there is no indication of them after the leaves have died down. The first indication is when the naked stem appears. The bulb does not like to be disturbed. Originally we had two clumbs of Naked Ladies growing under the Rose of Sharon. I carefully dug one clump to plant in another location. It took two years before the bulb in the new location bloomed. The picture is of the transplanted clump. It's a good thing I did move them though as our over zellous lawn care service has played havoc with the clump in the original location. One stalk remains so I put a small barrier around it to protect it from the weed wacker. I plan to mark the location then transplant the bulb in the spring to a better location. The Rose of Sharon have filled in so the lily is in shade most of the time.
Happy Gardening
Garden Gnome
I'm in the garden a lot as well as spending a great deal of time in the water during the summer months. I'm very, very careful so was surprised to have any problems. Almost two weeks ago, I had a suspicious mole removed and biopsied. Being terrified of needles this was no easy task! My dermatologist hoped for the results by the Friday as he was away on holidays the following week. No such luck and I knew we were leaving on the weekend for a short holiday. That week was so long! Finally they called on my cell to let me know everything was ok but any future moles like that had to come off as well. I was so relieved that at least this one was ok!
So here is the wake-up reminder. As gardeners we are in the sun a lot so we need to protect ourselves. Here are some of the things I do:
1) use high spf sunblock each and every day; make sure it is not expired
2) reapply as needed after sweating, swimming or 2 hrs outdoors
3) use protective clothing
4) always, always wear a broad rimmed hat to protect your face and neck
5) stay out of the heat of the day sun
6) protect your eyes with UV rated sunglasses
7) keep yourself well hydrated
My garden brings me incredible peace and joy despite some of the downsides. One of my favourite things to do is sit in the garden at the crack of dawn just as our little corner of the world is awakening.
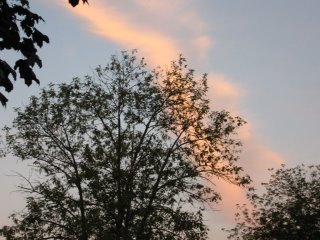 Morning Sky
This morning's sky did not disappoint. I watched as it turned into streaks of pinky red tinged with orange. The huge fireball slowly peaked over the horizon turning the sky into more shades of pink, red and orange mingled with bright blue. The old saying "Red sky in the morning, sailors take warning" is one that is heeded when you live on the water. We will have rain in some form before nightfall! I mused that day inside preserving would be welcomed as is the cooler weather. I'm in the mood to play with the canner. Instead of rushing inside, I sat and pondered while the pinky clouds gave way to whispy white clouds bordered by even whispier rippled, barely there clouds. What a gorgeous, beautiful display Mother Nature is capable of!
The morning has past with still blue skies. With the lower temperatures it is a perfect canning day! Possible storm clouds have just within the last hour appeared on the western horizon. I did my normal clean pick of the garden that included more cucumbers, tomatoes, beans and zucchini along with some basil, sage, thyme and bee balm. Cherry tomato puree is drying in the oven so the house smells nice. I have to pick up some corn today to continue with my corn freezing from yesterday. I don't grow corn but am seriously considering it next year as the only cultivar we can find here is of the peaches & cream variety. I'd really love some yellow Libbey corn! It is perfect freezing corn.
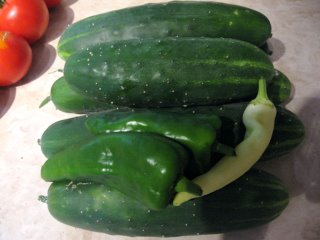 Straight Cucumbers
The Straight Eight cucumbers are now producing nicely. True to their name, they are a straight, nice shaped cucumber. In general the cucumber vines have not done well this year. Many area farmers were hit hard with a blight that has made its way into home gardens. My plants are showing some signs of stress but are still producing so I'm elated every time I find a nice sized cucumber. I planted pickling cucumbers as well, just enough for a batch of freezer pickles and maybe some dills. They didn't agree with this plan so if I'm lucky I will have enough for freezer pickles only.
I also picked two Ancho and one Hungarian Wax peppers. The Ancho are the only peppers that are doing well right now. Perhaps the cooler weather will help.
Happy Gardening
Garden Gnome
We have a couple of new garden tennants. They have been living rent free while they damage the premises. They have been evicted but not before their mug shots were taken! It took a good chunk of my time this morning but it had to be done.
 Squash Borer & Damage
My zucchini plants are in two raised beds. The first in bed #7 has four plants while the other in bed #5 has one. The zucchini in bed #5 have not caught up to the others but is still producing. Those in bed #7 are producing three to four zucchini daily.
Four out of five of my zucchini plants have been attacked by squash borer. The zucchini plants themselves show very little signs of damage as far as leaves or fruit production. I removed this squash borer by slicing the stem with a sharp knife then flicked out the borer. On at least one plant, I found more than one borer. As far as I know, I think I got them all. Once the borers were removed, I covered the damaged area and slit with fresh moist soil to prevent damage from other insects. Any affected leaves and there were few, were removed to ensure there were no borers hiding inside. Each bed then received a healthy dose of epsom salt. I'll wait to fertilize for a few days to be sure all borers were removed.
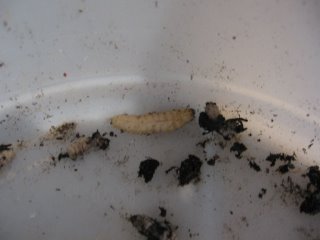 Squash Borer
Isn't he just a sweetie? The squash borer is really a nuisance! This is the second year I've dealt with them. Digging borers out of the stems is really not a fun way to spend your time. If caught in time, the plant can be saved and it will continue to produce. I'm confident I caught the infestation in time although this guy did enough damage in bed #5 that the plant may not produce as well.
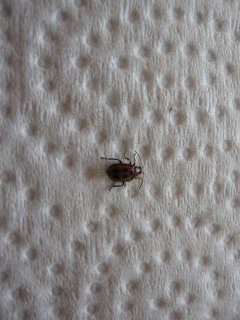 Bean Beetle
As per my previous entry, it has been the year of the beetle and I'm learning a lot about them. The bean beetle differs from lady beetles and Mexican bean beetle in that it has six spots along with two strips at the outer edges of its wings. It is about 4 mm long, close to the same size as the Mexican bean beetle but orangy red instead of tannish yellow. This is a destructive beetle that likes to feed on bean leaves. We live in an agricultural area so these types of insects find their way into the home garden. As always, my standard treatment is manual removal, identification as to friend or foe, then appropriate measures. Once this little guy was identified, he had his mug shot then went to beetle heaven.
Happy Gardening
Garden Gnome
Despite well above average temperatures, stiffling humidity and torrential downpours, my garden beds are thriving. They almost seem to be enjoying the weather and are blessing me daily with a full produce basket or more.
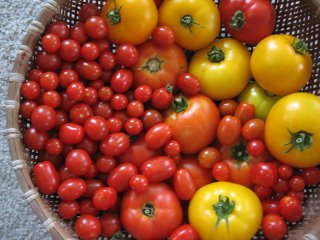 Tomatoes
I have thirty-two tomato plants outside with more in the greenhouse. The grape cluster and tiny tim tomatoes have been producing for awhile. It has been with great anticipation and patience that we have awaited the first ripe tomato for BLTs. When it's this hot cooking is really the last thing to think about so BLTs make a nice summer meal. We enjoyed our first BLTs Sunday night. The two ultra sweets were mouth watering!
Between Sunday and Monday's pickings I had almost a full basket of tomatoes. The cherry tomatoes are tiny tims and grape cluster. Towards the lower left corner almost hidden by the cherry tomatoes are three better boy tomatoes. The middle three tomatoes are ultra sweets. The lone red tomato at the top is the first of the beefsteaks from the plant that had BER. The rest of the tomatoes are lemon boys. My heinz and beefmasters are still green but it won't be long now.
This morning, I picked a nice sized beefsteak along with five ultra sweets and two lemon boys as well as about a quart of cherry tomatoes, green beans and a larger than I prefer zucchini. So the kitchen is overflowing with produce. I think I have enough lemon boys to make Savoury Yellow Tomato Spread so will likely work on that either today or in the morning. This is a nice dipping sauce for chicken fingers or spreading over barbequed fish.
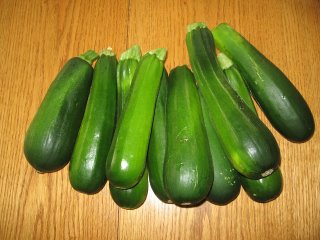 Zucchini
Zucchini really gets a bad rap sometimes. It is such a versatile vegetable that every gardener should grow it. You can use it in quick breads, in deserts, in meatloaf, and as a vegetable. It doesn't get much better than that! I'm getting three to four nice sized zucchini daily. Yesterday, I froze chunks and shredded zucchini. I also had enough green and yellow beans to can four jars. The pole beans are just starting so they will be coming in fast shortly. An entry detailing both will be on my cooking blog later today.
Happy Gardening
Garden Gnome


 Heat Sinks
 Bubble Wrap North Wall
 Inside View
 Roll-up Door Insulation


 Clematis
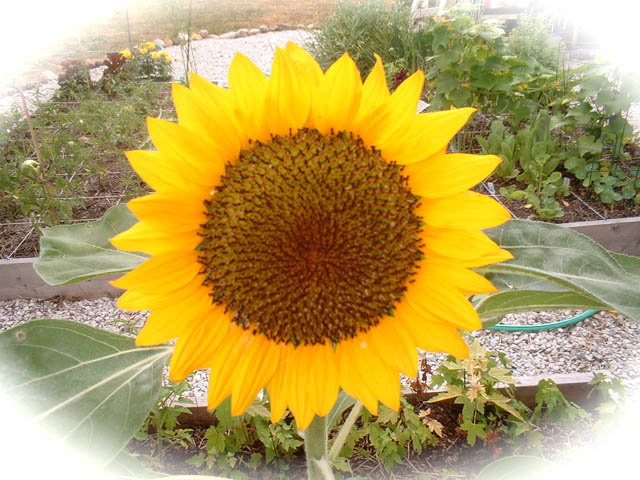 Sunflower
 Jade Sunflower
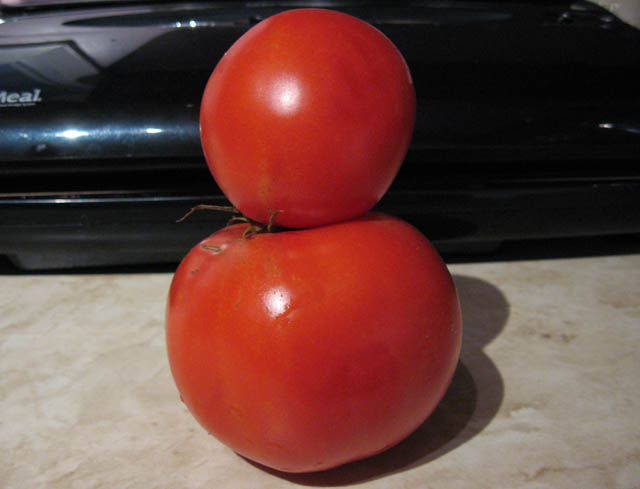 Tomato Snowman
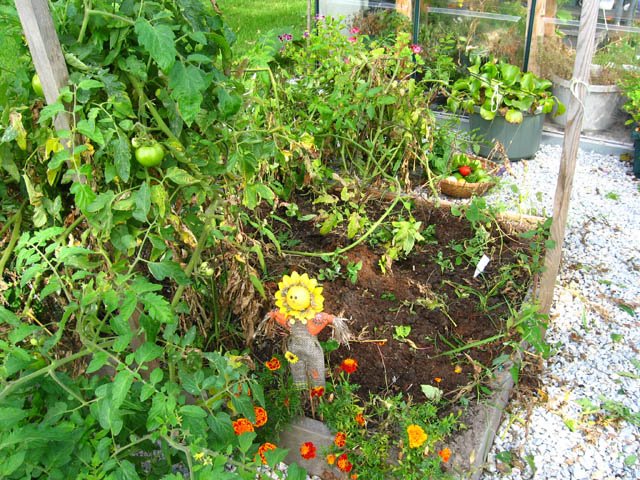 Bed #3
 Garden Visitor
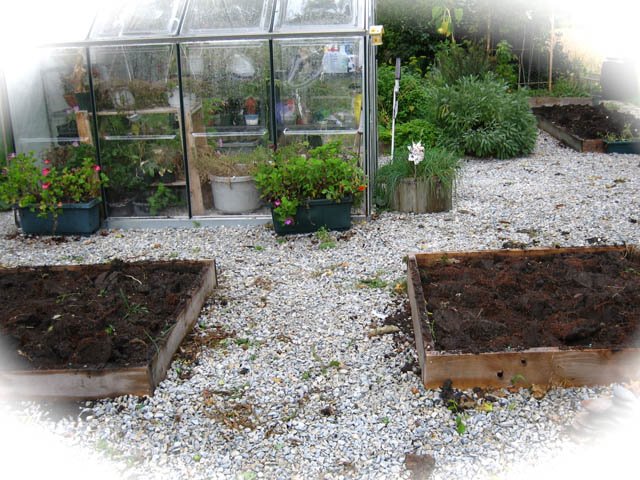 Rough Tilled Beds
 Herb Bed
 Ground Cherries
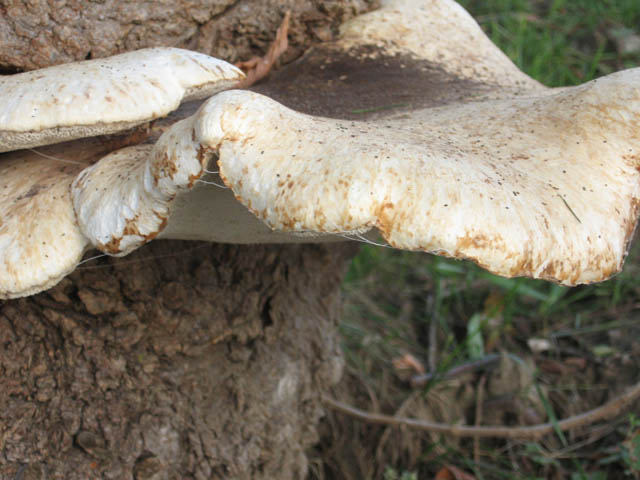 Fungus
 Fungus from the Top
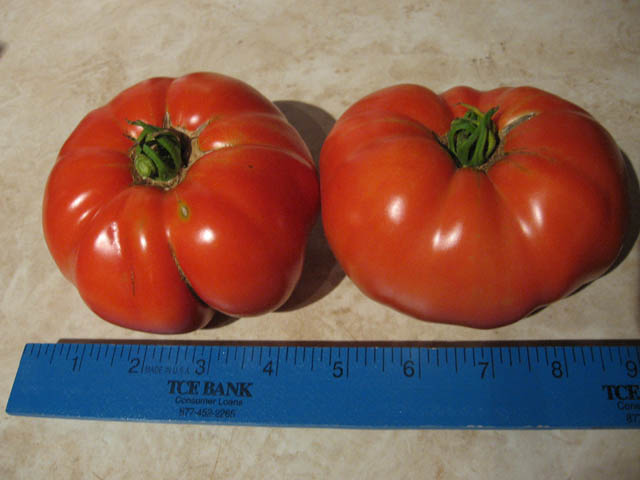 Beefmaster
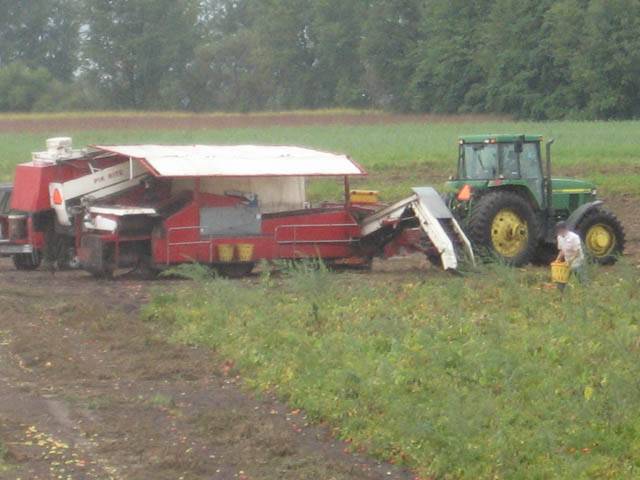 Tomato Harvester
 Row of Tomatoes
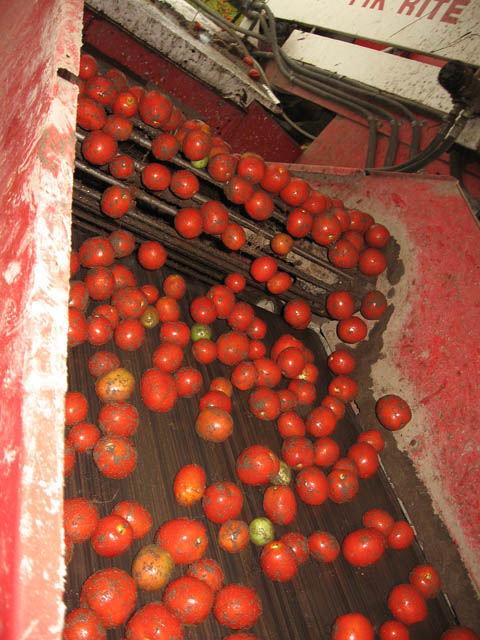 Tomatoes on Conveyor
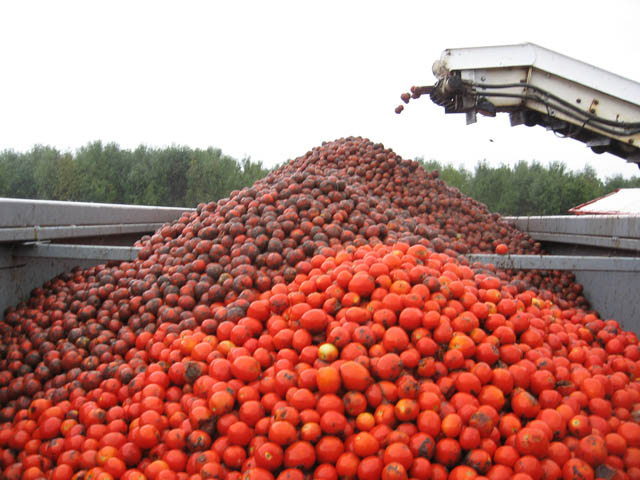 Loading into Wagon
 Wagon Load
 Tomato Trains
 T900
T900 Lady Beetle on Sunflower
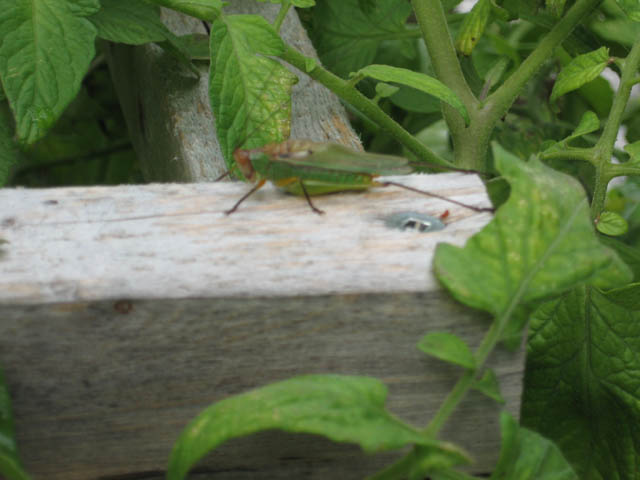
 Unidentified Rose Worm
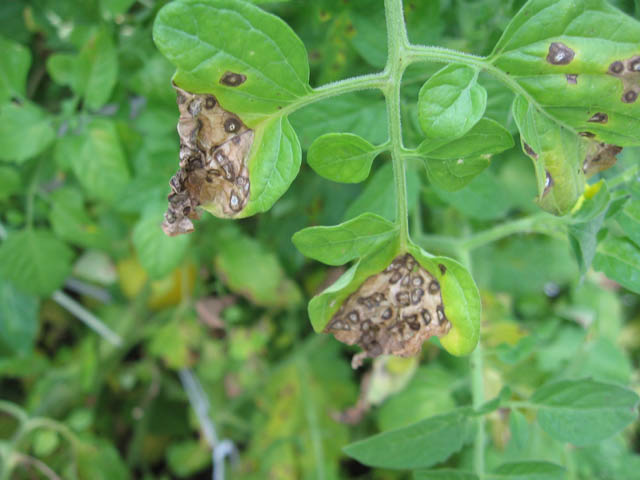 Late Blight
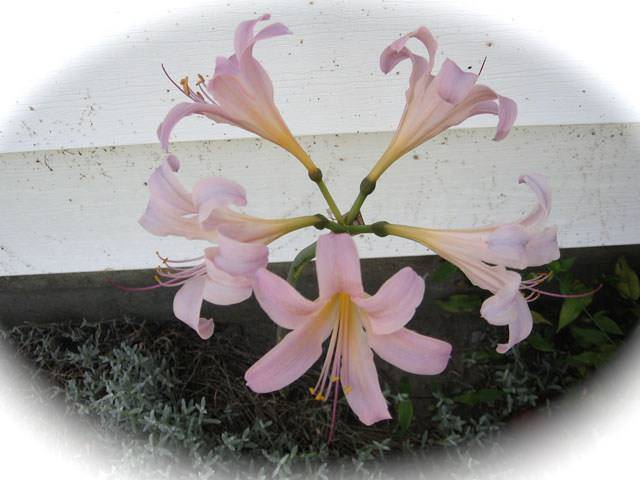
 Kentucky Wonder Pole Beans
 Kentucky Wonder Pods
 Romano Pole Beans
 Morning Sky
 Straight Cucumbers
 Squash Borer & Damage
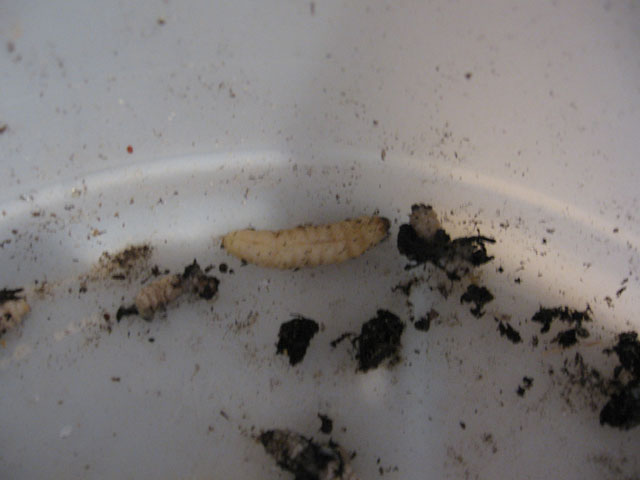 Squash Borer
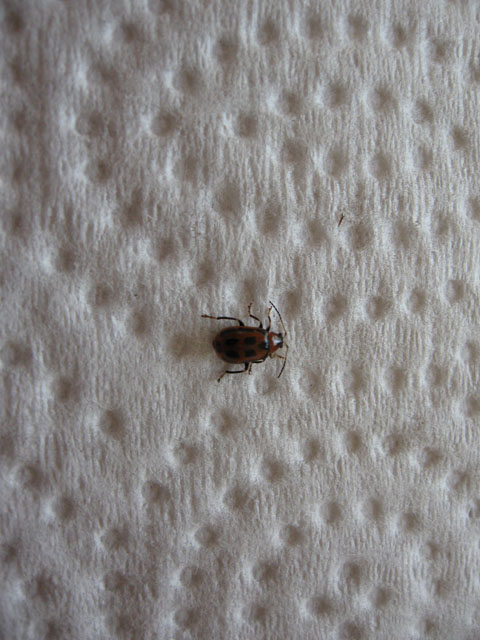 Bean Beetle
 Tomatoes
 Zucchini
 Black Ants with larvae
 Red Ants with larvae
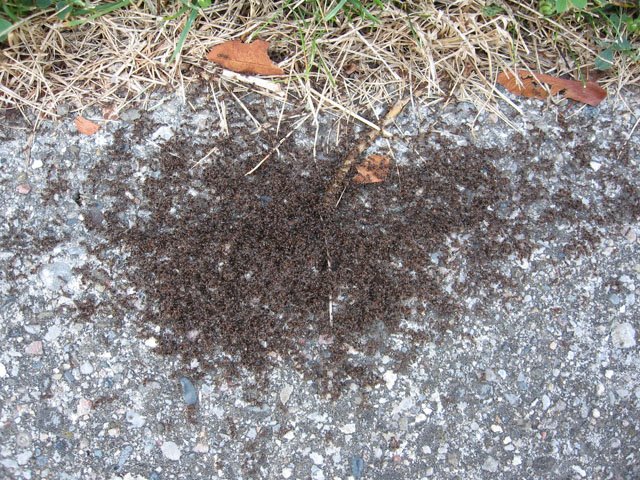 Swarming